Wednesday, October 31, 2012

Halloween WIPs & Storm Thoughts

Happy Halloween everybody!

Before I get on to the "business" of quilty stuff, let me comment a minute on the goings on along the East Coast. You may not know, but I'm a 13th generation Jersey Girl (yup, back to the 17th century!), and my thoughts are very much with my "people" right now. The devastation we're seeing on television is incomprehensible. My uncle and aunt, and many friends are awaiting word on the status of their homes, while other friends have already heard that they've lost their homes. My mother lost her electricity Monday night, and will likely not get it back for at least another week to ten days. Thankfully, the loss of life is remarkably low, but even so, more than 40 people have lost their lives across the East Coast, a number that is sadly sure to rise.

I feel helpless out here in Utah, and strangely guilty as I drive blithely around in beautiful 65 degree weather. The ones most effected by this disaster can't watch the news coverage, while the rest of us can tune in! When I spoke to my mother on the phone this morning, she was hungry for news about what was going on.  We just sent off a care package via FedEx, which will hopefully arrive tomorrow. She has been missing her morning coffee, so we sent her a french press coffee pot that doesn't require electricity, along with some crossword puzzles, some snacks, a wind-up flashlight, a lantern, and a supply of batteries (something hard to come by back east!). I feel a bit better to  be able to ease her discomfort somewhat.


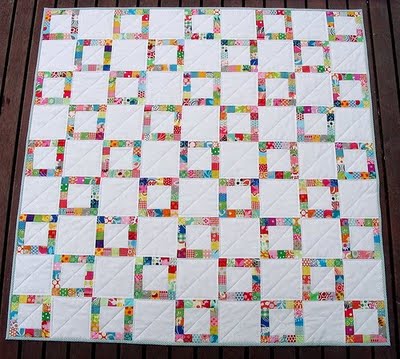
I also feel good that I was able to finish my mom's Mama Lilly quilt so I know that she is keeping warm (since the heat is off) snuggling beneath the quilt!


Now, onto Wednesday's WIPs!

First, my starts:
1) I've signed up for the Modern Christmas Tablerunner Swap that Kirsten over at Gemini Stitches is running, and I've gotten started on stalking my secret partner and designing a table runner . . .  good times! I'm thinking trees . . . .
2) Dog bone quilt: I've just started a fabulous gift quilt with paper pieced dog bones. By "started" I mean I've decided to do it, selected the fabric, and am starting to cut out the paper pieces I need for the bones. Early stages people!
3) Tree skirt: I've designed the layout for a combination paper pieced/appliquéd Christmas tree skirt. This is also a retreat project. See my prior post for my ambitious plans!

Next, my continuing WIPs:
1) Red cardigan: I finished the back and have started on the front side panels
2) Pieced scrap border quilt: I have all the pieces cut out and ready to sew together. I'm going to my 3-day retreat next Wednesday, so I'm holding off on sewing those together until then . . .  I think!
3) Denyse Schmidt block quilt: I have the blocks sewn together, and now just have to figure out the layout . . .

And finally, my finishes:
1) Starflower zippy pouch
2) a little traveling sewing kit (photo to follow!)

I'm linking up with Lee over at Freshly Pieced for her Wednesday WIPs. Go check out the fabulous projects that everyone has linked up over there!!

Monday, October 29, 2012

Storms a brewin'

So while the entire eastern seaboard of the United States is battening down the proverbial hatches and gearing up for the storm of the century, I'm looking out at a beautiful fall day with not a cloud in the sky. Kind of surreal! Most of my friends and family are back East, so my thoughts and prayers are most definitely with them hoping that roofs and cellars remain dry and power outages are not too prolonged! Discovering that my mother is without a large flashlight was not a happy moment yesterday! Fortunately, she lives in a close community, so I'm trusting that she can rely on the kindness of her neighbors should she need some help!

I have been working steadily at several projects, some of which will remain secret for a while longer, but one of which I can give a peek. I've so fallen in love with the starflower block that I did the other day that I decided to try it again, this time in a zippy pouch. This was a rather bold move as I kind of hate zippers. Or they hate me, I'm not sure which! I am rather proud to announce, however, that this time I prevailed (insert trumpet fanfare here!). I used Noodlehead's fabulous tutorial for her scrappy makeup bag, although I added tabs to the zippers, which she doesn't include.


This has boxed corners, which I do love. I will admit that there was a minor sewing room injury in the making of this zippy pouch . . .  I was snipping the corners off and apparently was over-zealous and snipped the webby flesh between my thumb and first finger. Ouch! I guess this is a good time for a testimonial for sewing room safety! Ironically, after slightly nicking my fingertip last week with my rotary cutter, I purchased a safety glove which I was NOT wearing when using my apparently quite sharp scissors! The glove is amazing: it has a steel core and is cut resistant. It's made by Intruder (sounds tough, doesn't it?!) and I now wear it whenever I'm using my rotary cutter . . . I may now need to rethink things and start wearing it when I use my scissors too!

So, everyone stay safe out there -- whether from sharp implements or dangerous storms!


Friday, October 26, 2012

Blogger's Quilt Festival!

Today I'm linking up with Amy's Creative Side as part of her Blogger's Quilt Festival. I've decided to share my Mama Lilly quilt, which I made for my mother for her birthday this year. I made it from her vintage Lilly Pulitzer golf skirts, along with a a Lilly Pulitzer dress I found at a thrift shop for only $10! My mom has been a marvelous golfer, and I wanted to honor her achievements with this quilt. I'm so thrilled that this quilt came out so well, particularly since I've only been sewing for a year!

 This is the quilt in all her glory:


 You can't really see the detail in that picture, but in the center is a tiger, taken from one of my mother's Lilly Pulitzer tiger skirts. Here's a better shot: 


For those who may not be familiar with Lilly Pulitzer fabric, its fabulously vibrant resort wear, best known on the East Coast, particularly in New England and Florida. As the story goes, Lilly Pulitzer got her start on a fruit juice stand in Florida, and she began making vibrant clothing to cover up the fruit juice stains on her clothes!

And here's a shot of a close-up of the quilt, along with a peek of the backing, which is also Lilly Pulitzer fabric. It has peacocks on it. I was terrified of peacocks when I was little, so I thought it was the perfect choice for my mother's quilt!


This is the first "largish" quilt I've done, coming in at 72x65 inches. Machine quilted and pieced. Quilted by me! Best category: throw quilt.


If you haven't done so already, definitely stop by Amy's blog and check out the other quilts on her festival. There are amazingly talented folks out there!!


Seeing Stars

I have a friend who is one of those extra special people who remembers every birthday, anniversary, and other holiday with a card or text. I thought it was time I turned the table and let her know how grateful I am for her thoughtfulness. I've also been meaning to try my hand at this starflower block I found over at Ellison Lane Quilts for some time, so it seems the perfect time to make this for my friend! If you haven't yet, go over and check out her blog. She is fabulously talented and has some great tutorials!

This was also the perfect use of my ever-growing scrap heap! I've been inspired by the recent spate of blogs on using scraps and so I've climbed into my scrap baskets and pulled out some some goodies to work with.


I finished the top last night and, amazingly enough, the blocks actually line up! I know this is what is was supposed to do, but that is often so far from what happens with my piecing! Of course, I did originally swap two of the segments when I was sewing it together, so I had to unpick lots of stitches and try again . . . .  Anyway, I think I love this block!

I've been reading on a number of blogs about color value (check out Sew Katie Did or Stitched in Color, for example), and after doing this star block, I get what they're saying. Do you see how the darker blue fabric has a darker value than all the rest of the fabrics. It's not just that it's a darker color, but that it is denser and isn't in balance with the other ones. If I were to do this again, I'd either find a blue with a value more consistent with the other ones, or I'd pull on some darker values in some of the other colors (like the red, orange, and green) as well to balance it across the star.

Now I'm just trying to decide how to quilt this. Should I hand quilt an outline of the star? Or, should I machine quilt parallel lines outlining the start? Or, other suggestions?

Thursday, October 25, 2012

Swap Happy!

I've been on the road so much the past several months that I've missed out on a few great swaps. With the Christmas holiday fast approaching (8 weeks people!), I've been hankering for a swap opp, and now I've found just the one!

As you may remember (because I just know that you've been committing all my blog posts to memory!), I participated in the Modern Christmas Tablerunner Swap last fall, run by Swap Mama Susan of Canadian Abroad. It was my very first swap and my very first tablerunner, and it was simply a fabulous experience. This is what I made:


I had never done paper piecing before and thought I'd just pick it up (not realizing how difficult it is). But I fell head over heels in love with paper piecing during the process.

And just look at the totally amazing tablerunner that Emily at Strawberry Patch Ramblings made for me! Go check out Emily's blog; she does beautiful work!


I'm so so lucky! Isn't this completely gorgeous?!


I was so inspired by this experience that when I heard that Kirsten at Gemini Stitches is going to be Swap Mama on another round of a Modern Christmas Tablerunner Swap, I just knew that I had to jump in! Susan did such a great job leading this swap last year, but she has her hands full right now, so Kirsten is stepping in to keep the swap going. Yay!

I'm particularly excited because when I did this swap last year I was really just starting out as a sewist. While I still have so much to learn and improve on (FMQing, anyone?!), I'm excited by how much my skills have developed and I'm really psyched to try out some new techniques and play with some new ideas. This swap last year also really got me in the mood for the Christmas holiday--nothing like stalking your swap-ee and making something for someone else to get the holiday spirit going!

For anyone interested in joining this swap, there is going to be a fast turnaround, so sign up now! Sign-ups close on October 29th, partners assigned by October 31st, and the finished tablerunner should be in the mail by the end of November. You can sign up here on Flickr. It's going to be fun!!

Wednesday, October 24, 2012

Wednesday Works in Progress

I'm linking up with Lee at Freshly Pieced for WIP Wednesday! It's been a busy week, and I have a few things to share . . .

First, my finish for the week--my Happy Ironing ironing pad:


And be sure to check out my free pattern!


Next, in anticipation for my upcoming retreat, I've gotten started cutting and piecing my fabric scraps for the pieced scrap border quilt I found on Red Peppers' Blog.


The tutorial calls for a 45 x 45 quilt, but I'm planning on making this a queen size, so I've doubled the number of scrap blocks. The bright side of a bad week of insomnia is that I've cut out almost 450 scraps from fat quarters and sewn 120 blocks. Oy! I'm hoping to get my contrasting white blocks cut out before the retreat so that when I get there I can just put it together!

In addition to this project, I've started a cardigan. I have a favorite, soft cardigan that I found in San Diego a few years ago, and I've decided to try my hand at making another one in this luscious red color:


Here's the original I'm working from:


The back is almost done, and then I'm on to the front panels . . .


Thanks for stopping by!

Tuesday, October 23, 2012

Sewing Room Tour


I've been settled into my new house for a few months now, and I just realized that I haven't shared any pictures of my fabulous new sewing room! It's still a bit of a work in progress, but I thought it was time that I had a tour!

My new sewing room is about 4 times as big as my last one--yes, the last one was quite "cozy!" In my new room I actually have room to lay out a queen-sized quilt on the floor (at least when the pups aren't trying to lounge around right in the middle of the room!). 

This room is a combined sewing studio/office space, so I have set up my desk and computer in one corner:


The desk top is from an old (very heavy) finished board I found in the throwaway pile at work. I attached some Ikea legs and it was good to go! On the desk I keep my patterns in binders and cardboard magazine holders. The wooden case on top of the desk is a divided office mail box (on its side) that I found at our university surplus store. Only $10!

The big monitor is perfect for catching up on my TV shows on Hulu. . . . it's positioned perfectly so I can watch it from my sewing machine but also look out the window at life passing by:


The sewing table is a great find from a local rummage sale . . . Karen transformed it from the laminate top with some fabulous red paint. On the ledge behind the sewing machine are my first machine (a 1970 Singer) and a great vintage Underwood typewriter.


I posted a while ago about these great old bookcases I found at a yard sale over the summer. I knew right away that they'd be just perfect for my fabric and such! These cabinets are about 100 years old, and came from a local vintage furniture store where they were built-ins. They're five feet tall and five feet wide. 


Aren't these fabulous?! I was a little shocked, however, at how quickly I filled them up! I have yardage stored in the right cabinet, wrapped around acid-free, fabric friendly boards I got online (they're originally intended as supportive inserts in comic books for collectors, go figure!). In the left cabinet I have my fat quarters, all stacked by color (of course!).


And here are the goodies that I have stored inside:


I've fallen in love with Mason jars, and I use them for storing spools of ribbon, zippers, selvedges, and fabric scraps. I found the fabulous vintage blue ones (on the left) with a zinc top I found in an antique store near Yellowstone. I still can't bring myself to put anything in the vintage blue ones yet! Sigh. 


I found the rest at a local thrift stores (only $1 each people!) or (the two on the right) at my local Walmart (under $10). I have found that I'm so much more likely to use my scraps and selvedges in my regular sewing when they are accessible like this. Plus, they look pretty!

I also took all the pretty shells I've collected over the years, and I put them in a jar too--a great way to display them without adding too much clutter!

T


In my last sewing room I had a small (12x17 inch) cutting mat that shared space on my desk. As a result, when I'd sit down to do work on my computer I was always pushing aside scraps of fabric. Such a pain! One of the things I'm excited about in my new sewing room is my cutting table and extra large cutting mat! 


The cutting mat, which fits the table perfectly, is 45x36 inches. So awesomely huge! I have a small ironing surface I made from a piece of wood, batting, and old fabric, which I keep handy to press my work as I cut. 

As full disclosure, before I took these pictures I removed all the clutter that was stashed under the table!! Karen is going to build me storage shelves which will fit beneath the table and hold all my extra things: batting, my scrap basket, knitting, etc. I can't wait! 

And last, but not least, I have my favorite chair and ottoman, which is perfect for knitting, finishing quilt bindings, reading, playing guitar, and napping! 


Thanks for taking a tour of my space! 

Monday, October 22, 2012

Happy Ironing Pattern

Happy Monday!


Today I'm sharing the paper piecing pattern I created for the iron on my Happy Ironing ironing pad. It's the very first pattern I've created and shared on my blog, and hopefully it makes sense to everyone! You can find the pattern here, on my Patterns & Tutorial page.

I use tracing paper when I do paper piecing, as I find it rips off more easily than printer paper or freezer paper. Tissue paper (really cheap at the $ store!) also works well, especially for larger images. If you're looking for a great tutorial on paper piecing, check out Very Kerry Berry's blog.

I'd love to hear your feedback about this pattern and would also love to see what you do with this!

Friday, October 19, 2012

Ironing out the wrinkles . . .

Hi again! I had the most amazing idea: since I have a blog, I might actually blog regularly! Really! Total epiphany, right? As I'm sure y'all can appreciate, the challenge for me of blogging is not so much finding the time to blog, but finding something to blog about. Because really, my life is just not that exciting!!

So, in keeping with the "gearing up for the retreat" theme, I finally tackled a project that I've had in mind for months: a traveling ironing pad! April has the most amazing one that I totally coveted, and it inspired me to try my hand at it. I've been loving the paper piecing that I've done for my sewing machine cover and sewing machine "placemat," so I came up with a design for a paper pieced iron.


I was surprised at how simple this design turned out to be--really simple angles! It took me about an hour, start to finish! I'll post a tutorial for the iron tomorrow.

And here's the back:


I know, it's pretty exciting, eh? But oh so functional! I'm so happy to have knocked this off my "to do" list in time for the retreat next month.

Thursday, October 18, 2012

Retreat Planning


So to continue on the retreat wagon . . . here's what I'm thinking about working on during the retreat:

1) Pieced Scrap Border Quilt

I found this great tutorial on Red Pepper Quilts' blog. It calls for 20 different fabrics, but only in small, 1.5 x 5.5 inch strips, so you can totally use fat quarters (or less) for this project. I'm using rainbow-ish colors (yes, I'm still on the rainbow kick!): aqua blue, dark blue, green, red, and orange, and I'm using 4 fabrics for each color.

The tutorial is for a 45.5 x 45.5 inch quilt. Perfect for a snuggly baby gift! I'm thinking, however, I might try to make this a full-sized quilt. I had insomnia last night and spent several hours cutting out 228 strips--enough for the original size. I'm not relishing the thought of going back to the cutting board, but I really do want this a bit larger!


2) Christmas Tree Skirt

I also want to work on a Christmas tree skirt. Last year I made a Christmas pillow for my mother, using a paper-pieced tree and gifts and an appliquéd rendition of my puppy Sophie. I want to build on this idea and turn it into a tree skirt. This picture is what first inspired my project:


Isn't this card so sweet?! So, here's my plan for the skirt: I'm going to have the tree and gifts in one corner, with one of our pups on top of the packages and the other sitting at the base of the gifts looking up. In the opposing corner of the skirt I'm going to put our two pups and a friend cruising down a snowy hill on an old-fashioned sled. I got the idea from Stephen Huneck's fabulous dog print.


Aren't these three so cute! Sophie (our black lab mix) and Zoey (our brown border collie-lab mix) have a little friend, Teddy, who is a yellow lab mix, so this is a great image of the trio! I even found some great wood-grained brown fabric that will be perfect for the sled! I'm kinda dreading the appliqué for Zoey, however . . . she has a wonderful border collie coat (unlike Sophie who has the more typical lab coat shown in the woodcut image above), and as a result she has all this wispy, feathery fur that flows off her. It's beautiful, but the shagginess is much harder to capture neatly in appliqué!

I'm still sorting out what to do with the two remaining corners. Paper pieced trees? Houses? Suggestions are welcome!

3) Ruby & Camille Scrap Quilt

Last year I won some great Ruby & Camille fat quarters and pre-cut strips in Film in the Fridge's giveaway. She has a great tutorial for her Ruby Strings quilt. It's a whole lot of paper-piecing of the strips, but I love the finished look! This one will be a gift for someone very special to me who is currently going through a tough, tough time.

This project is made more appealing because most of the strips are already cut. Phew!


4) Ana White Work Apron

At her book tour appearance the other day, Ana White (see prior blog post) was giving away a few of her great work aprons. I didn't happen to win one, so I want to make one for Karen. In addition to all the fabulous furniture plans she provides on her blog, Ana White has also shared a tutorial for the apron. Hopefully this will be a quick project!

I know, I know! Too much to accomplish, but there is so much I want to do! Project mania!

Wednesday, October 17, 2012

Gearing up!


I know, I know!! Two days of blogging in a row!

In a few weeks I'm headed to the Utah Valley Quilt Guild retreat in Park City. Yay! High altitude quilting! I'm starting to pull my projects together and I am, of course, planning to accomplish in 3.5 days way more than is humanly possible! 

We're doing a pin cushion exchange, and I tackled one this last week:


There are so many great, free tutorials out there that it took forever to decide what to do! I especially loved the ones that Darling Adventures' blog shared! I have no idea what the other retreat ladies are making, so I hope mine is good enough! 

We're also doing a secret sister exchange of goodies over the course of the retreat. There's a $2 limit per day, so I have to be creative. I'm trusting that they're not assigning me to Sue, my roomie, and since I don't know anyone else at the retreat (and seriously doubt they follow my wee blog!), I'm spilling the beans . . . In addition to a few fat quarters, I decided to make a few things. First, I made one of Keyka Lou's great little clutches. It fits a cell phone, a credit card or two, and some cash. These have become my go-to gifts of late.


I also made this mug rug with a paper pieced spool:


I used selvedges for the spool's "thread." Thankfully, my free motion quilting is continuing to improve! Now if I can just manage to figure out how to FMQ on a large quilt and not just tiny mug rugs!


Tuesday, October 16, 2012

If I had a hammer . . .

Long time no see, my friends! I know we returned fairly recently from a whirlwind, cross-country, LONG trip, but I headed out of town again! Visited New York City for a weekend and then crossed the mighty Hudson into New Jersey to visit family. A great visit--minus the fender bender I was in. Crunch! I was unfortunately driving my mom's car, so I feel guilty returning to Utah to my functioning car while hers is still in the shop. Sigh. Fortunately, no one was injured (the cars notwithstanding)!

So, back to brighter news . . .  yesterday we went to see Ana White at The Home Depot. Are y'all familiar with her great blog? Her site has tons (and I mean TONS) of free DIY plans for every imaginable constructable project: tables, Adirondack chairs, bookcases, armoires, beds, children's furniture, etc. She provides great plans, easy to follow instructions, super tips, and fabulous ideas! The Home Depot was "giving away" (er, selling?) her fabulous book with any $20 purchase.

The book is so great!! I loved literally every project in the book. She even had plans for making a children's play kitchen (stove and counter-top). So cute!

Thankfully, Karen is really handy with the power tools, so I think we're going to have some new furniture in our future! I was actually given an Ana White welcome home surprise last week--a gorgeous farm bed headboard (I've never actually been to a farm that has had these headboards, but that is what they're called!).


Doesn't this look fabulous?! Weird colors, though . . .  the quilt on the bed is actually a sea foam blue/green color and here it just looks a dingy brown. Yikes! Karen also made a headboard for my mother over the summer. So handy! I think the next project on the block is going to be matching bedside tables. Yay!