Showing posts with label appliqué. Show all posts

Wednesday, October 2, 2013

Don't read this post Marion or Emily!

Now I'm hoping that Marion and Emily have greater restraint than I would with such a post title. For me, that's an invitation to keep reading! But then again, I was the child who would do some "research" once the Christmas presents started appearing beneath the tree!

I'm following Mischelle's great advice to just warn off Marion and Emily in the title so that I can actually show y'all what I'm working on. Especially since that's the only sewing I've done in ages!

First, you remember Emily and Marion's great medallion centers with the gorgeous work done by the other ladies in our round robin? Marion's is the one on top with the adorable Matryoshka dolls all in a circle and Emily's is the gorgeous star in reds and blues. 

Here's what I did with Marion's:


Given all that was going on with this quilt so far, I thought I might just add a quiet border that pulls from what others have already done. So I added this cute material from the Sew Mama Sew collection:

This is the material that Marion used in the very center of the quilt (at the feet of the nesting dolls). It's also what is in some of the lighter colored squares in the great purple and black checkerboard border. 

I love the center and I love Jeanette's phenomenal appliqué, so I wanted to do something that would highlight them by not distracting from them. I figured something too busy might not be good right next to the birds. 

I added a 3 inch border (not including seam allowance). That's the minimum border we're supposed to add in each round. 

And here's what I did with Emily's quilt:


Excuse the lack of pressing! I added the red and blue borders. Jeanette again did her magic with her appliqué on either side of the square. I decided to square it up by adding an imbalanced red border (which mirrors the fabric used in the center of the star), and then added blue to frame it all and to mirror the blue checkerboard border surrounding Emily's medallion. Emily said that she wanted to emphasize blues and reds, so hopefully this is what she was thinking!

For those interested in the house progress, we've finished stripping wallpaper and ripping up carpeting, and we've repainted the stairwell, upstairs hall, and den Coastal Vista blue:


We were still finishing touching up the upper part of the stairwell, so that's why the handrail is blue (tape) and the banister is covered with a plastic bag. 

And for those who have requested puppy photos, I will leave you with a picture of Sophie in her and Zoey's favorite spot in the house (on an ottoman in the den). Isn't she cute with her chin resting on the window sill?!


Thursday, October 18, 2012

Retreat Planning


So to continue on the retreat wagon . . . here's what I'm thinking about working on during the retreat:

1) Pieced Scrap Border Quilt

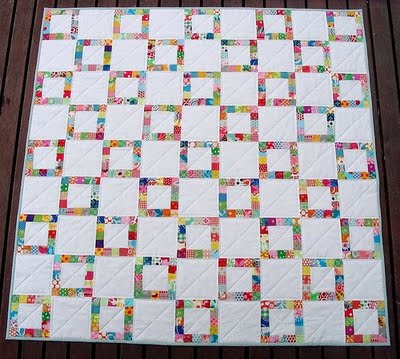
I found this great tutorial on Red Pepper Quilts' blog. It calls for 20 different fabrics, but only in small, 1.5 x 5.5 inch strips, so you can totally use fat quarters (or less) for this project. I'm using rainbow-ish colors (yes, I'm still on the rainbow kick!): aqua blue, dark blue, green, red, and orange, and I'm using 4 fabrics for each color.

The tutorial is for a 45.5 x 45.5 inch quilt. Perfect for a snuggly baby gift! I'm thinking, however, I might try to make this a full-sized quilt. I had insomnia last night and spent several hours cutting out 228 strips--enough for the original size. I'm not relishing the thought of going back to the cutting board, but I really do want this a bit larger!


2) Christmas Tree Skirt

I also want to work on a Christmas tree skirt. Last year I made a Christmas pillow for my mother, using a paper-pieced tree and gifts and an appliquéd rendition of my puppy Sophie. I want to build on this idea and turn it into a tree skirt. This picture is what first inspired my project:


Isn't this card so sweet?! So, here's my plan for the skirt: I'm going to have the tree and gifts in one corner, with one of our pups on top of the packages and the other sitting at the base of the gifts looking up. In the opposing corner of the skirt I'm going to put our two pups and a friend cruising down a snowy hill on an old-fashioned sled. I got the idea from Stephen Huneck's fabulous dog print.


Aren't these three so cute! Sophie (our black lab mix) and Zoey (our brown border collie-lab mix) have a little friend, Teddy, who is a yellow lab mix, so this is a great image of the trio! I even found some great wood-grained brown fabric that will be perfect for the sled! I'm kinda dreading the appliqué for Zoey, however . . . she has a wonderful border collie coat (unlike Sophie who has the more typical lab coat shown in the woodcut image above), and as a result she has all this wispy, feathery fur that flows off her. It's beautiful, but the shagginess is much harder to capture neatly in appliqué!

I'm still sorting out what to do with the two remaining corners. Paper pieced trees? Houses? Suggestions are welcome!

3) Ruby & Camille Scrap Quilt

Last year I won some great Ruby & Camille fat quarters and pre-cut strips in Film in the Fridge's giveaway. She has a great tutorial for her Ruby Strings quilt. It's a whole lot of paper-piecing of the strips, but I love the finished look! This one will be a gift for someone very special to me who is currently going through a tough, tough time.

This project is made more appealing because most of the strips are already cut. Phew!


4) Ana White Work Apron

At her book tour appearance the other day, Ana White (see prior blog post) was giving away a few of her great work aprons. I didn't happen to win one, so I want to make one for Karen. In addition to all the fabulous furniture plans she provides on her blog, Ana White has also shared a tutorial for the apron. Hopefully this will be a quick project!

I know, I know! Too much to accomplish, but there is so much I want to do! Project mania!

Wednesday, March 7, 2012

Advancing!

Okay, so I was retreating, so now that I have returned from a fabulous sewing retreat, I guess I am again advancing! One can only hope, at least!

My friend Ella hosted a fabulous retreat this weekend "down south" (meaning out in God's country past the border's of Salt Lake County!!). It was a sleepover. I don't think I've had a sleepover for ages, and it was so much fun! It was a great group of quilters and scrapbookers. Great food, great laughs. We watched Footloose, which somehow I had missed when it first came through in the '80s (okay, the truth is out, I was glued fairly solidly to the books back in high school!). Very cool thing, Much of Footloose was filmed in Utah, and the church scenes were actually filmed at the Presbyterian Church where our retreat was held! Kind of surreal to see all those famous people sitting in the very hall where I was just sitting working on my sewing project! Thanks, Ella, for such a wonderful weekend! Can't wait for the next one!

Being the oh-so organized sort that I am (insert laugh-snort here), I didn't quite get my act together until the last minute, so I just threw all sorts of fabric and projects together into a large bin (or two), figuring that I'd have TONS of time to get ALL sorts of things done. While I'm so thrilled with all I got done, of course I brought WAY too much fabric. Funto be able to pull it out and admire it, however. Kind of like long lost friends! And, we did have a fabric swap, so it came in handy to have around!

So, what did I work on at the retreat? Patience, patience . . . ! I have been wanting the perfect sewing machine cover for a while, but I was waiting for divine inspiration to hit me. I was collecting my Heather Ross sewing notions fabric, putting together some ideas, and then it finally came together. I honestly didn't think I could pull it off. . . . and it's not quite finished yet, but it's almost there!

So, linking up with Lee's WIP Wednesday, here's my almost finished sewing machine cover-I just have to take in the end a bit to allow for a snugger fit, and then make a lining. Here's the paper pieced side with spools (using Heather Ross's Munki Munki sewing notions spools section on the left):


I pulled from my selvedge collection
for the "threads" on the spools. The top and bottom spools use my Echino Bicycle selvedges (which say "Bicycle" and then something in Japanese).


For the second side, I really wanted shears, but the thoughtof paper piecing them gave me the horrors (sort of--I was game for a challenge, but the people around me I think were afraid they would never see me emerge from my sewing room again, so they kept chanting "appliqué," "appliqué"). Here's that side:


I learned how to do appliqué at Pam's retreat last fall and I totally fell in love with it. I can't see myself doing more traditional, entire appliquéd quilts (am
azing as I think they are), but I love what can be done with appliqué!

As you can see, I fell in love with two different grey fabrics, so I used the Japanese polka dot on the spools side and this one on the shears side.

So, now I just know you're simply dying to know what I've done for the ends of the cover. I know, I know! Thanks for humoring me! Here's what they look like:


I used the Half Moon Moda scissors in grey/white and green/white using paper piecing, and then I framed it in grey--using the polka dots on one side and the other grey (how's that for giving the fabulous fabric designer his/her credit--sorry!) fabric on the other.

I am, if I can actually be so bold to say, quite pleased with myself. I have only been sewing since June, so this time last year I would have thought a "feed dog" was a reminder to feed the pups. For some insane reason, I was crazy enough to start with paper piecing as my first sewing lesson, and I totally fell in love withit. I've realized, however, that almost no one teaches how to make patterns! There are tons of generous people all over blogland who amazingly share their techniquesand patterns, but everyone seems to learn on their own how to make their own patterns. Sigh. I think I'm going to make that my next mission!

Only other thing to report is that I finished and mailed off my zippy pouch for the Mouthy Stitches swap. I had precious little info to go on, as my secret partner was really more of a silent partner. Fortunately, I had one little gem of info--she likes Union Jacks. So here's what I made:


The non-Union Jack side has pintucks running down the turquoise fabric (it's hard to see in the photo). I hope she likes it! It was my very first Union Jack, and I'm fairly amazed that the paper piecing (mostly) lined up!